
【学习日记】移植LVGL(基于STM32F103ZET6)
前言
记录在FreeRTOS系统上移植LVGL。
准备
1.硬件
最好使用一块带触摸屏的开发板,这里使用的是STM32F103ZET6
2.软件
裸机移植
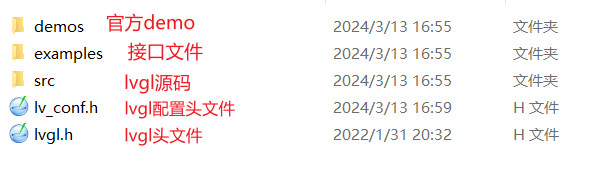
下载完LVGL源码后我们需要保留以下文件
由于LVGL的移植较为繁琐,这里我们先进行裸机的移植,完成后再进行FreeRTOS的移植。
1.工程文件配置
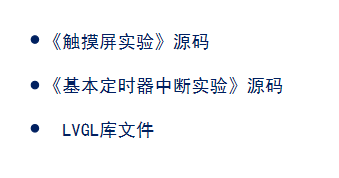
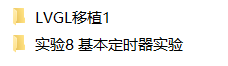
对于裸机的移植,我们需要准备以下工程
我们以触摸屏实验作为移植后的工程文件,将其改名为LVGL移植1
接下来我们需要做以下几步
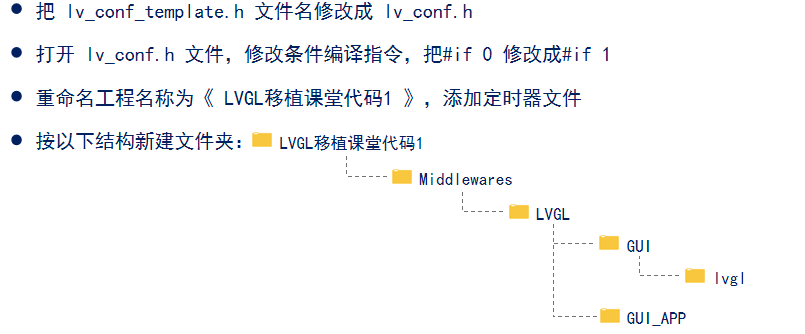
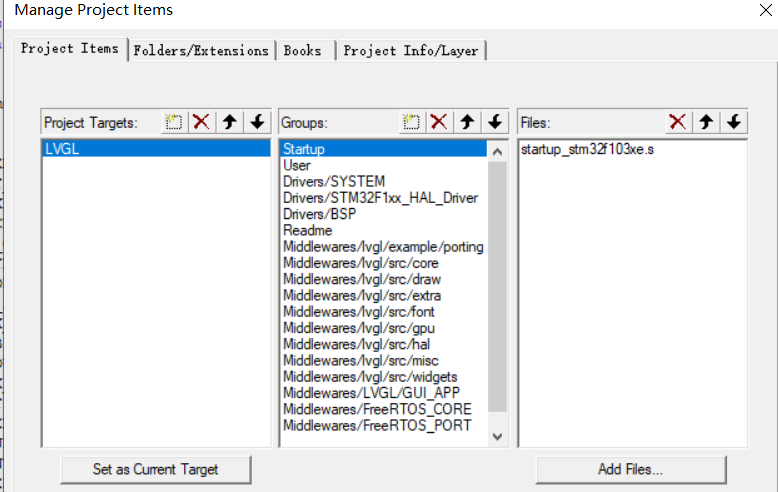
完成后在keil内新建分组以及相关.c文件

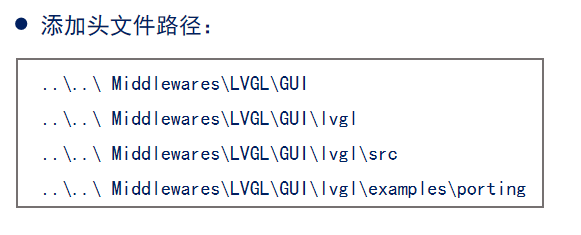
添加头文件路径
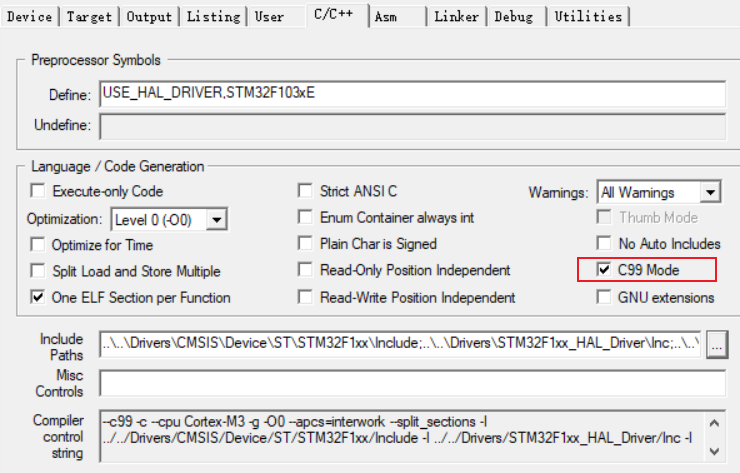
开启keil的C99模式,编译后剩下的警告不用管
2.触摸屏配置输出
1.将 lv_port_disp_template.c/h 的条件编译指令 #if 0 修改成 #if 1
2.在lv_port_disp_template.c中包含LCD的头文件1
在 disp_init 函数中初始化屏幕设备,设置横屏1
2
3
4
5
6static void disp_init(void)
{
/*You code here*/
lcd_init();
lcd_display_dir(1); /*1为横屏,0为竖屏*/
}
3.配置图形数据缓冲模式1
2
3
4
5
6
7
8
9
10
11
12
13
14
15
16 /* Example for 1) */
static lv_disp_draw_buf_t draw_buf_dsc_1;
static lv_color_t buf_1[MY_DISP_HOR_RES * 10]; /*A buffer for 10 rows*/
lv_disp_draw_buf_init(&draw_buf_dsc_1, buf_1, NULL, MY_DISP_HOR_RES * 10); /*Initialize the display buffer*/
// /* Example for 2) */
// static lv_disp_draw_buf_t draw_buf_dsc_2;
// static lv_color_t buf_2_1[MY_DISP_HOR_RES * 10]; /*A buffer for 10 rows*/
// static lv_color_t buf_2_2[MY_DISP_HOR_RES * 10]; /*An other buffer for 10 rows*/
// lv_disp_draw_buf_init(&draw_buf_dsc_2, buf_2_1, buf_2_2, MY_DISP_HOR_RES * 10); /*Initialize the display buffer*/
// /* Example for 3) also set disp_drv.full_refresh = 1 below*/
// static lv_disp_draw_buf_t draw_buf_dsc_3;
// static lv_color_t buf_3_1[MY_DISP_HOR_RES * MY_DISP_VER_RES]; /*A screen sized buffer*/
// static lv_color_t buf_3_2[MY_DISP_HOR_RES * MY_DISP_VER_RES]; /*Another screen sized buffer*/
// lv_disp_draw_buf_init(&draw_buf_dsc_3, buf_3_1, buf_3_2, MY_DISP_VER_RES * LV_VER_RES_MAX); /*Initialize the display buffer*/
这是LVGL提供的三种图形缓冲模式
单缓冲区:
LVGL 会将显示设备的内容绘制到这里,并将他写入显示设备。
双缓冲区:
LVGL 会将显示设备的内容绘制到其中一个缓冲区,并将他写入显示设备。需要使用 DMA 将要显示在显示设备的内容写入缓冲区。当数据从第一个缓冲区发送时,它将使 LVGL 能够将屏幕的下一部分绘制到另一个缓冲区。这样使得渲染和刷新可以并行执行。
全尺寸双缓冲区:
设置两个屏幕大小的全尺寸缓冲区,并且设置 disp_drv.full_refresh = 1。
LVGL 将始终以 ‘flush_cb’ 的形式提供整个渲染屏幕,只需更改帧缓冲区的地址。
这里我们选择第一种,将下面两种注释或者删除。
4.配置屏幕尺寸
这里我们使用了正点原子动态获取屏幕尺寸的方式,当屏幕改变时不需要手动修改屏幕尺寸。1
2
3/*Set the resolution of the display*/
disp_drv.hor_res = lcddev.width;
disp_drv.ver_res = lcddev.height;
5.在 disp_flush 函数中配置打点输出
1 | static void disp_flush(lv_disp_drv_t * disp_drv, const lv_area_t * area, lv_color_t * color_p) |
3.触摸屏配置输入
1.将 lv_port_indev_template.c/h 的条件编译指令 #if 0 修改成 #if 1
2.按需要裁剪输入设备
由于我们的设备输入只有触摸,所以只保留触摸相关
1 | static void touchpad_init(void); |
1 | /********************** |
1 | void lv_port_indev_init(void) |
1 | /*------------------ |
3.包含输入设备驱动头文件
1 |
4.在 touchpad_init 函数中初始化触摸屏
1 | static void touchpad_init(void) |
5.配置触摸检测函数
1 | static bool touchpad_is_pressed(void) |
6.配置坐标获取函数1
2
3
4
5
6
7
8/*Get the x and y coordinates if the touchpad is pressed*/
static void touchpad_get_xy(lv_coord_t * x, lv_coord_t * y)
{
/*Your code comes here*/
(*x) = tp_dev.x[0];
(*y) = tp_dev.y[0];
}
4.提供时基
1.添加定时器驱动

添加.c文件和.h文件
2.在定时器驱动.c文件中包含:#include “lvgl.h”
1 |
3.在定时器中断函数(回调)中调用:lv_tick_inc(x);1
2
3
4
5
6
7void HAL_TIM_PeriodElapsedCallback(TIM_HandleTypeDef *htim)
{
if (htim->Instance == BTIM_TIMX_INT)
{
lv_tick_inc(1);/* LED1反转 */
}
}
5.配置main函数
1.添加头文件
1 |
|
3.在while中每隔5ms调用一次lv_timer_handler();
1 | while(1) |
4.进行测试1
2
3lv_obj_t* switch_obj = lv_switch_create(lv_scr_act());
lv_obj_set_size(switch_obj, 120, 60);
lv_obj_align(switch_obj, LV_ALIGN_CENTER, 0, 0);
在FreeRTOS上移植LVGL
1.移植准备
这里我们需要准备两个工程,一个为之前裸机移植的工程,将其改名为LVGL移植2,另一个工程为FreeRTOS工程,关于如何移植FreeRTOS,可以查看往期教程
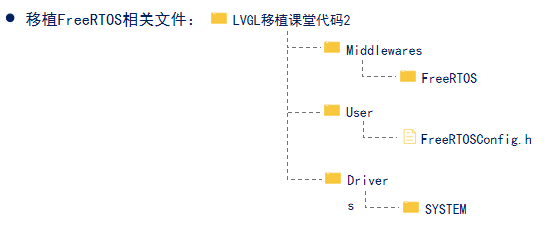
2.移植FreeRTOS相关文件
1.添加文件
2.在keil内添加分组
3.添加对应的.c文件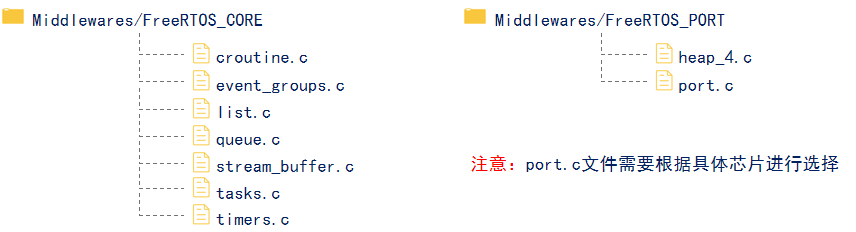
4.添加头文件路径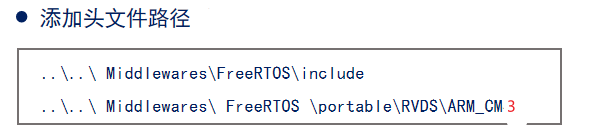
5.打开HAL库中断相关的.c文件,屏蔽SysTick 中断、SVC 中断、PendSV 中断1
2
3
4
5
6
7
8/**
* @brief This function handles SVCall exception.
* @param None
* @retval None
*/
//void SVC_Handler(void) 屏蔽SVC中断
//{
//}1
2
3
4
5
6
7
8/**
* @brief This function handles PendSVC exception.
* @param None
* @retval None
*/
//void PendSV_Handler(void) 屏蔽PendSV中断
//{
//}1
2
3
4
5
6
7
8
9/**
* @brief This function handles SysTick Handler .
* @param None
* @retval None
*/
//void SysTick_Handler(void) 屏蔽SysTick中断
//{
// HAL_IncTick();
//}
6.修改宏定义__NVIC_PRIO_BITS
1 |
7.在lv_conf.h文件中配置自定义时钟源,删除定时器提供时基的部分代码1
2
3
4
5
6
7/*Use a custom tick source that tells the elapsed time in milliseconds.
*It removes the need to manually update the tick with `lv_tick_inc()`)*/
1
2// btim_timx_int_init(10-1, 7200-1);
// lv_tick_inc(1);
8.新建lvgl_demo.c/.h文件,创建OS任务,调用/编写demo

9.在main.c中包含头文件#include “lvgl_demo.h”,调用lvgl_demo();函数1
2
3
4
5
6
7
8
9
10
11
12
13
14
15
16
17
18
19
20
21
22
23
24
25
26
27
28
29
30
/**
* @brief 清空屏幕并在右上角显示"RST"
* @param 无
* @retval 无
*/
int main(void)
{
HAL_Init(); /* 初始化HAL库 */
sys_stm32_clock_init(RCC_PLL_MUL9); /* 设置时钟, 72Mhz */
delay_init(72); /* 延时初始化 */
usart_init(115200); /* 串口初始化为115200 */
led_init(); /* 初始化LED */
key_init(); /* 初始化按键 */
lvgl_demo();
while(1)
{
}
}
移植完成
移植遇到的坑
编译的时候报内存不够
修改lv_conf.h,适当减小分配给LVGL管理的内存

将这个值适当改小
运行的时候卡死在某界面不动
增加栈空间
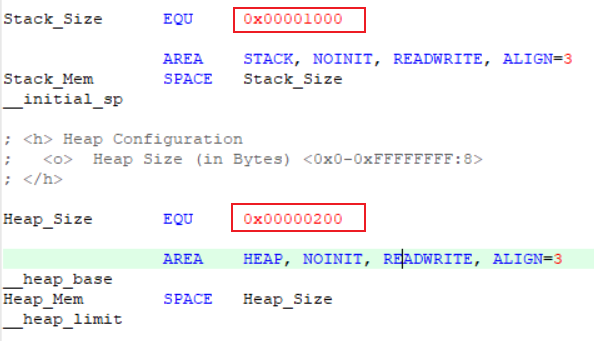
可将这两个值改大